Monday, November 21, 2016

Craftsy Class Launch!


So happy to share the launch of my online Craftsy Class entitled Step by Step Photorealistic Coloured Pencil Portraitswhich which takes you through the process for drawing our beautiful model Katie and includes a comprehensive materials list, with all the pencils used, along with a helpful instruction sheet that will assist you in working through the video. You can find out more information here

Here is a sneak preview of the class..


This class is an interactive class and I welcome your questions and will always endeavour to get back to you within 24 hours.

Monday, October 31, 2016

Craftsy Class Coming Soon!!!!

I am so excited to share that I have just come back from Denver Colorado where I filmed an online art class with the fabulous crew from Craftsy. The class is entitled Step by Step Photorealistic Portraits in Coloured Pencil and should be available late November. If you would like to be in with a chance to win this class for free then you can register here. The winner will be announced on the day the class is launched.

Thursday, September 1, 2016

All New Coloured Pencil Conversion and Comparison Charts ~ Extended Version

Many of you have contacted me asking for the original coloured pencil conversion charts to be expanded to include more brands of pencils. I am so happy to announce that I have finally been able to create the new extended version of these charts. Now with 55 pages, the new version includes conversions and colour swatch comparisons for the following brands:

* Prismacolor Premiers (including 18 new colours)
* Faber Castell Polychromos
* Caran D'ache Pablos
* Caran D'ache Luminance
* Derwent Artist
* Derwent Coloursoft
* Derwent Drawing
* Lyra Rembrandt Polycolor.

You can find the new charts on my website here


Australian Caran D'ache Ambassador


I am proud and honoured to share that I have been selected to be one of the Australian Ambassadors for Caran D'ache products. These products include the Luminance and Pablo pencils which are excellent quality pencils with very high lightfastness ratings and it is a pleasure to have the opportunity to endorse and support these wonderful products. Our main aim is to increase the availability and distribution of Caran D'ache products within Australia.

Thursday, June 2, 2016

How to Draw White Dogs


I have lost track over the years of how many times I have been asked to create a tutorial on drawing animals with white fur. This gorgeous little dog called Monty seemed like the perfect candidate. This comprehensive 28 page step by step tutorial is full of high resolution images and simple to follow instructions and explains which colours to use to achieve realistic portraits of animals with white fur and is available from my website here. Pencils used in this tutorial include Prismacolors, Polychromos, Lyra Rembrandts and Verithins.

Saturday, May 28, 2016

Brand New Coloured Pencil Tutorials

Unsure about which coloured pencil brands to buy, or which surfaces will best suit your needs? Which ones erase the best, or work best with solvents? Looking to learn more about the different blending methods? This 52 page information kit Coloured Pencil Basics for Artists of All Levels will answer all those questions and many more. Inside the kit you will also find a special thank you discount code of 10% off your next purchase.


Struggling to get a rich and uniform black colour in your coloured pencil backgrounds? This 30 page information kit How to get Rich Black Backgrounds in Coloured Pencil road tests 14 different black pencils and shows you which coloured pencils will give you the darkest, most consistent black colour. We look at whether using a blender or solvent will make the blacks smoother or richer and also how the wax and oil based pencils perform when used over other mediums such as markers and watercolour pencils. Whether you are a purist and prefer working in 100% coloured pencil, or are happy to mix your coloured pencils with other mediums there is a solution in this kit for you.


Friday, February 26, 2016

Time for a Makeover!

I have been contacted several times by the host of my 9 year old website telling me that the software I used to create my site all those years ago will soon become obsolete and so after much procrastinating and resistance I have created a whole new website under the domain name www.karenhullart.com and am so much happier with the new site and wonder why I didn't do this years ago!! My old site www.miniatureartbykhull.com will still operate for the next month and will then cease to exist and the domain will redirect to my new site. Please don't hesitate to let me know if you have any issues with or feedback about the new site :)


Wednesday, October 14, 2015

Australia has its very own Coloured Pencil Society!!!!

I am extremely excited to announce that Australia proudly now has its own coloured pencil society. We invite everyone, artists and appreciators, local and international, to join the AUSCPA family and grow with us towards creating an internationally recognised pool of talent and inspiration, particularly for those who have never used coloured pencils before! Please visit our website www.auscpa.org and explore the possibilities! (I for one am extremely proud to be a part of this, and know what we have planned! It is truly a new era for coloured pencils in Australia! )

Monday, July 13, 2015

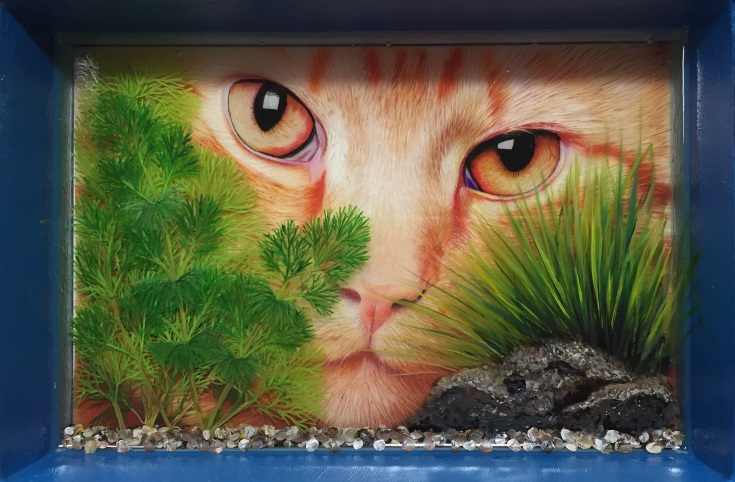
Layering Drafting film and resin for a 3D affect

The Curious Visitor
9x7 inches
Coloured pencil, pan pastels and a touch of ink on four sheets of
drafting film separated by thin layers of resin
 As some of you know, I have been experimenting lately with using resin in my artworks, although my previous attempts have used acrylic for subsequent layers. Whilst working on my last piece, I became a bit frustrated with the way the acrylic applied to the resin and so I decided to discard it for a while and experiment with multiple layers of drafting film that had coloured pencil applied to them and then the resin in between each layer. I had a bit of an idea as to how the finished piece might look, but also had to let go of the total control I usually like to have and allow the piece to develop in its own way. The following images show the three earlier layers and how this piece developed.


The first layer was drawn using pan pastels and the resin under this layer was tinted with avocado green resin colouring agent.


This second layer was drawn using coloured pencils and some pan pastels were also added to the back of the film to enhance the look of the disappearing horizon. As you can see, this scanned version of the second layer has a lot more detail than you can see in the final piece, but I really wasn't disappointed to lose that clarity - it added to the misty effect I was after.


This image shows the third layer after it has been added to the other two layers. This layer was drawn using only a black Polychromo pencil.

Sunday, June 21, 2015

Latest 3D artwork - Horsing Around

Horsing Around
4x6 inches
Coloured pencil on drafting film and 14 layers of acrylic and resin
This is my latest venture into the world of 3D resin art - I still have a long way to go in perfecting this technique, but am having fun along the way.

Sunday, June 14, 2015

Watching the development of 3D resin art

The following images show you the 14 steps involved in creating this 3D resin artwork

I Know You're In There
5x7 inches
Coloured pencil on drafting film and acrylic and resin on wood

This is the first layer and was drawn using coloured pencils on drafting film.
All subsequent layers were painted using acrylics, with a thin layer of two part epoxy resin between each layer of pant to slowly build up depth and dimension.


Saturday, May 16, 2015

Trying out some 3D art

Stunned by the Neons
5x7 inches
Coloured pencil, acrylic and resin on wood

Tempting Fate
4 inches across
Acrylic and resin in a small bowl
I have long been fascinated by the works of Riusuke Fukahori and Keng Lye and was inspired to give this intriguing technique a trial run. 'Tempting Fate' was my first attempt and I must admit this is a huge learning curve, trying to transition from thinking in 2D to 3D and also adjusting to how the resin accepts the acrylic paint. There are quite a few artists who have emulated the works of Riusuke Fukahori and Keng Lye and I wanted to come up with a style and theme that more closely resembled my own style of art. I have always loved drawing cats and was also curious as to how coloured pencil works would go when covered with resin. Regular papers aren't ideal because the resin would seep into the porous surface of the paper and alter it's structure but the drafting film is a 100% polyester and so I thought this might have a chance of holding up well to the application of resin. I applied fixative to the coloured pencil prior to adding the resin and thankfully there were no changes to the coloured pencil marks once the resin was applied. Subsequent layers of fish and plants were added using layers of acrylic paint and resin. You can watch a slide show of the build up of these 16 layers on YouTube

Monday, April 13, 2015

A New Series, New Support and New Medium

Monet's Makeover #1
12x16 inches
Coloured Pencil, Winsor and Newton Watercolour Markers and Micron
Micron pen on Xerox Polyester Paper
 After quite a few failed attempts with my previous series on Tash, I have gone back to what I know, which is drawing quirky and colourful animal drawings. This series features Monet the mouse who adds colour, mischief and fun to the world around him. I have used a new surface for this drawing - the Xerox Polyester paper which is very similar in feel and application to drafting film, only it is a solid white colour and is heavier in weight.


This first image shows how I used the Winsor and Newton Watercolour markers to underpaint the tortoise.


It can be hard to get deep darks on the polyester paper using coloured pencils alone, and so for the head and feet of the tortoise, I used the Staedtler Lumocolor Permanent pens to underpaint.


Monet mouse was drawn in using mostly only coloured pencils (Polychromos, Pablos, Verithins, Derwent Studio).


One of the great things about the Polyester paper is that you can use a blade, abrasive eraser or Fibreglass brush to scratch out highlights and textures as I have done in the shell of the tortoise.

Stay tuned and hopefully, there will be more to add to this series :)

Wednesday, April 1, 2015

Mystique

Mystique
12x16 inches
Coloured pencil on Canson mat board
The second in my series of creative faces, but even though this was fun and the colours are bright, I still am not happy with the level of creativity... so hard to shake off that need for realism and tap into that right side of the brain. Will keep persevering though, and I welcome thoughts and suggestions. :)

Tuesday, March 31, 2015

Launching a new series

Scent of a Rose
12x16 inches
Coloured pencil on Canson Ash Grey Mat Board
A big thank you to my son's beautiful girlfriend Tash who allowed me to do a photo shoot with her and I am going to use these photos for my new series which will explore the use of the human face as a canvas for creativity. I want to combine the elements of realism, trompe l'oeil and whimsy to try to develop a bit more creativity with my portraits - an area I have always struggled with.

Tash is an extremely talented musician, singer and song writer and has a big following on YouTube, has won many awards for her singing and song writing skills and is constantly in demand for gigs so I was extremely grateful when she gave up an afternoon of her time to help me out.

Thursday, March 12, 2015

My Selfie

My Selfie
8x10 inches
Coloured Pencil on Colourfix Suede board
I can't decide at the moment whether to do another project for my Beautiful Human Landscapes Project, whether to do another tutorial, or whether to do something completely different. So whilst in that indecisive phase, I decided to do a little fun piece entitled 'My Selfie', which combines some of the things I love the most - colour, realism and a touch of Trompe L'Oeil. This was a struggle though because of the surface I chose - Colourfix Suede. No matter how many layers I did, I couldn't cover up the texture and since I always go for that nice smooth look, this was a bit of a distraction for me.

Anyone have any ideas for my next project? I'm always open to suggestions :) 

Wednesday, March 4, 2015

Bill's Selfie with WIP's

Bill's Selfie
12x16 inches
Coloured pencil, pen and ink on Pastelmat
Reference photo kindly provided by Bill himself


I was quite shocked to see that it has been almost 6 months since I posted anything on my poor blog and that is in large because we have been renovating our house and I have been madly painting and doing lots of things other than sitting at my desk. Happily, the renovations are all completed and so I can get back to the drawing table and this is the results of my first portrait fort the year. It is 12x16 inches, and has been drawn using Polychromos, Prismacolors, Verithins, Derwent Artists, Coloursoft, Pablos, Lyra Rembrandts and Bruynzeel pencils, along with some Faber Castell pitt pens and a touch of white paint on Clairefontaine Pastelmat. A huge thank you to Judith Crown and her Father Bill for providing me with the fabulous reference photo for this artwork - he truly was a joy to draw.