Saturday, August 31, 2013

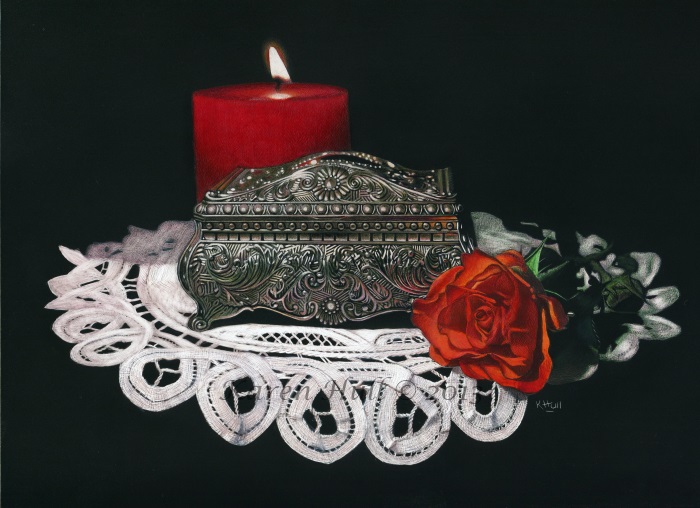
Getting your coloured pencils to pop on a black background

Full o' Beans
9x12 inches
Coloured pencil, Gouache and white ink on Black Mat Board
I have spent the last couple of weeks redoing this piece over and over. I love working on a black background, but get a bit frustrated with the way some of the coloured pencil colours, particularly the reds, lose their vibrance when working on a black background. I decided to underpaint with a white medium. Underpainting with white coloured pencil is quite ineffective and really doesn't add to the vibrancy of colours added in subsequent layers. So I experimented with white acrylic, Gouache, gesso, Colourfix primer and white watercolour. None of them gave me 100% satisfactory results. The jellybeans needed to look smooth and glossy and some of the more textured primers such as the gesso and colourfix made it hard to achieve that smoothness. The pencil didn't apply as well as I wanted over the acrylic or Gouache either. I have dabbled with the Golden Drawing ground, but find it a little too slick for coloured pencils and some of the vibrancy of colour is lost. So, I tried diluting the Gouache with the Drawing ground. The chalkiness of the Gouache was reduced with the slickness of the ground and vice versa. I still wouldn't say that this is the perfect solution, but it was the best of all the options I tried. Back to the drawing board to find that elusive magic formula!!! :)

Saturday, August 10, 2013

Colouring your Scratchboard tutorial

The Promise
8x10 inches
Scratch art, Inktense pencils, Coloured pencils and ink on Ampersand Scratchboard


When I first completed The Promise artwork, I was inundated with questions from other artists about my techniques for colouring scratchboard. In response to these questions, I have put together this 27 page step by step tutorial which shows how I went about scratching each element in the piece and then how the colour was added. The tutorial is available from my website at http://www.miniatureartbykhull.com/tutorials_36.html. For anyone new to scratch art, this piece is probably a rather ambitious one to start with, but you can still apply the principles to any piece you are working on. I have given a brief description of all the tools used and even some I didn't use, but I know other artists do use. If you are new to scratch art or scraper board, I can highly recommend Diana Lee's book Starting From Scratch. At some point, I hope to put together some more tutorials on scratchart that are much simpler. Subjects that have either fur or feathers are ideal for scratch board and so I would like to perhaps work on a cat tutorial next.

Thursday, August 8, 2013

Fun on Black

Hitching a Ride
9x12 inches
Coloured pencil on black mat board

Warts and All
8x10 inches
Coloured pencil on Black Paper
It has been a while since I have had the chance to do either art or blogging and finally I can get back into both. We had a lovely family holiday in Melbourne last month and then our eldest son and his lovely fiance had quite a large engagement party, so we have had lots of lovely things going on. I have a bit of an addiction at the moment for working on a black background - I just love the contrast that can be achieved the way the colours really stand out. 

I have been asked by several people how I get the colours to look so bright. Last year I put together a series of coloured pencil charts ( which are available from my website at http://www.miniatureartbykhull.com/tutorials_36.html) and one of the things I did when creating these charts was to do a swatch for every single colour in for four different brands of pencil on 6 different surfaces, including the black. This really helped me to work out which brands and indeed which colours stand out the most on the black surface. I have to say my all-time favourite for working on the darker surfaces are the Caran D'ache Pablo's. They give vibrant colour and layer really well. Both of these artworks were done using mostly Pablo's and then Verithins were used for the detail and the Faber Castell Polychromos were used for burnishing and polishing.

Thursday, June 6, 2013

Summer Holiday

Summer Holiday
9x12 inches
Coloured Pencil on drafting film
 
When we first start out as artists, it takes a while to work out what our own personal style is and this can be the hardest struggle of all. Over the years I have dabbled with a whole range of subject matter and materials, but quirky, colourful realism is what I always come back to and the thing that makes my heart sing. I am always grateful to have commissions and illustration work, but every now and then it is lovely to focus on creating art from the heart.

Thursday, May 9, 2013

I Love You, Mum - Kookaburras

I love You, Mum - Kookaburras
16.5 x 33 cm
Inktense pencils, coloured pencil and Pastel on Colourfix Suede
This is another illustration for the children's book entitled I Love You, Mum, due for publication by Hachette in 2014. I am using Colourfix Suede for these illustrations, which is a really versatile surface and is extremely receptive to a wide variety of media. As the Colourfix Suede is primarily heavyweight Watercolour Paper with the specially prepared primer applied, you can use water media without the fear of buckling and I find any wet media glides over the top, and because of the slight tooth, you get a very even application. The tooth on this surface is nowhere near as sandy or textured as the original Colourfix papers, so you can still get a high degree of detail, and yet also put down multiple layers. I have found most surfaces that allow for fine detail are quite limited in the number of coloured pencil layers they will accept and conversely the more textured surfaces which do allow for lots of layering are not so great for doing fine detail. 

Tuesday, May 7, 2013

Busy days

Mother Earth
8x10 inches
Coloured pencil on drafting film

I Love You, Mum - Dingos
16.5 x 33cm
Coloured pencil, Inktense pencils and Pan pastels on Colourfix Suede
 
Lot's of work lately and so not much time for posting. The Mother Earth illustration at the top of the page was a fascinating commission where the client presented me with one of Josephine Wall's beautiful paintings and asked me to recreate it in coloured pencil, but requested that I change the animals and butterflies in the wing to add a bit more detail. Josephine kindly and very generously gave permission for me to use her artwork as the reference. She truly is an inspiration and I would love to have her vision and imagination.
The illustration below is the fourth illustration for an upcoming children's book to be published by Hachette Australia in 2014.
I have also spent the last week working on another commission, which I can't reveal yet as it was commissioned as a gift.
Apart from having plenty of work to keep me busy, it has also been a very exciting time for our family, with our eldest son and his beautiful girlfriend of five years becoming engaged, so lots of lovely preparations going on. Back to the drawing board!!! :)

Monday, April 8, 2013

First demonstration for the Nepean Art Society


Just a couple of snaps from the demonstration last night, where I ran through how to do a pet portrait such as Lucy (in my previous post) using coloured pencils on drafting film. Amazingly we had 40 people turn up and what a wonderful crowd they were - attentive and interested and asking lots of questions. I couldn't have asked for a better audience. I got so much out of the night and am very hopeful that everyone who came was able to take something away as well.