Sunday, December 8, 2013

Last artwork for 2013 and Season's Greetings

Bunny Banquet
12x17 inches
Coloured pencil and ink on Fabriano Artistico Paper
This will be my last artwork for 2013 as I pack up my 'studio' in readiness for Christmas and the arrival of lot's of interstate family. Sadly, my poor blog has been neglected this year as many other commitments have kept me away from blogging. My goal for 2014 is to post more blog posts, more WIP's and hopefully some Speed Drawing videos (once I spend the holidays working out how to do it). I wish you all a very safe and Happy Christmas and holiday season and look forward to sharing more art and news in 2014 :)

Wednesday, October 23, 2013

Refuge

Refuge
8x10 inces
Coloured pencils and zest-it with white ink
 highlights on Watercolour Canvas

As we are currently surrounded by so many bush fires, this is a reflection on the comfort, protection and salvation that water brings to those caught up in the heat, smoke and ash of the fires, and is dedicated to all those wonderful fire fighters who put themselves out there to protect the property and lives of others. May all those caught up in the fires stay safe and be given strength.

Wednesday, October 16, 2013

More Coloured Pencil works on Canvas

Jersey in the Cover
5x7 inches
Coloured pencil on Linen Mat board

The Curious Visitor
9x12 inches
Coloured pencils, Inktense pencils and white ink on watercolour canvas
(Black background painted with Jo Sonja's Background colours in Charcoal)

Falling behind again on my blogging - I do so wish there were more hours in a day!!! Here are just a few of the things I've been working on lately. I am so loving working with coloured pencils on canvas, whether it be watercolour canvas, as in The Curious Visitor or linen mat board as for Jersey in the Clover. Because I am so heavy handed with my pencil work, I have always found it a little dissatisfying working on regular papers, and so am constantly on the lookout for surfaces that allow both layering and blending and still provide the ability to do fine detail. I find the canvas surfaces perfect for this. The finished result is something more akin to a painting than a drawing and can be varnished and hung without glass. Watercolour canvas has a softer feel to it than traditional gessoed canvas surfaces and also takes the inktense pencils beautifully and allows for exciting possibilities when using other media with coloured pencils such as watercolours and ink. In my previous post, I shared a mini tutorial on working with coloured pencils on canvas and now you can try a more advanced piece with this latest 26 page tutorial.

Wednesday, September 25, 2013

Perfect Picking - Mini Tutorial - working with Inktense and Coloured pencil on Canvas

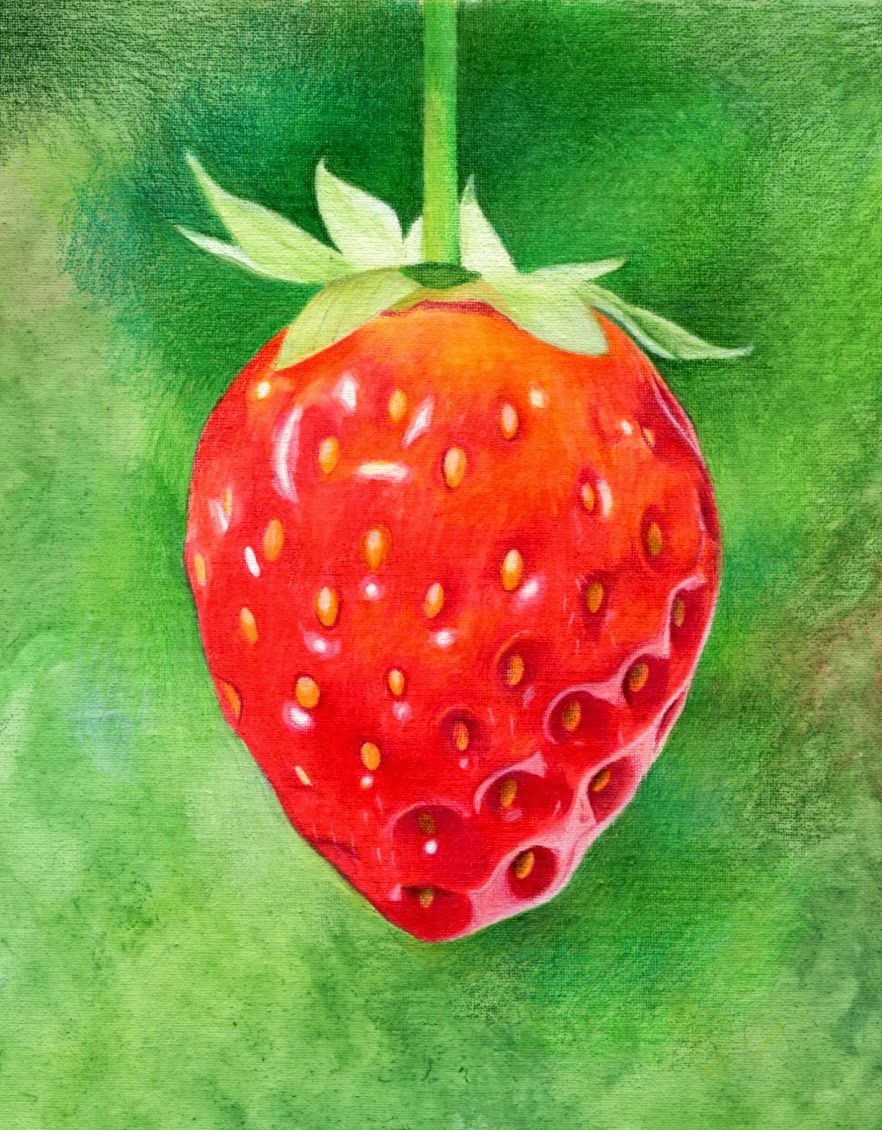
Perfect Picking - 5x7 inches
Drawn with Derwent Inktense and
 Coloured pencil on Watercolour Canvas

Reference Photo

Transfer of image
Draw your outline and transfer your drawing to canvas using your favourite method of transfer. The canvas I used was Renoir Watercolour Canvas Panel, which has a very fine weave and is similar to Fredrix Watercolour canvas. You can use any fine weave canvas of your choice and still get similar results.

Dry Derwent Inktense Pencils
Inktense Pencils used dry. Colours used for the Strawberry include Cadmium Orange, Scarlet Pink, Tangerine, Poppy Red and Cherry. The little strawberry pips were coloured with Sicilian Yellow. The strawberry leaves were given a very light application of Spring Green and the Background was done using a combination of Spring Green, Hooker's Green, Beech Green, Iris Blue and Scarlet Pink.

Water added to Inktense Pencils
This is the same image after water has been applied to the Inktense pencils. An 0 and 3 brush were used for the strawberry and an old rough flat brush was used to stipple the background.

Colouring with Coloured Pencils
Here you can see we have started to colour the background and strawberry using coloured pencils. Colours used on the background include Faber Castell colours Chrome Oxide Green Fiery, Permanent Green Olive, Permanent Green, Apple Green, Olive Green, Pine Green, True Green, Grass Green and Light Green. Faber Castell Colours used on the strawberry include Cream, Cadmium Yellow and Light Ochre, Dark Chrome Yellow for the 'seeds', Cadmium Orange, Dark Flesh, Vermillion, Deep Scarlet Red, Pale Geranium Lake, and Light Carmine for the red strawberry. Madder and Purple (also known as Red Violet) were used for the darker recesses around the seeds. Light Flesh was used for the pink highlights.

Blending and Burnishing with Caran D'ache Pablos
In this image, the leaves of the strawberry have been coloured using Faber Castell colours Apple Green, Light green, Light Ochre, Walnut Brown and Brown Ochre. At this point all areas are then blended and burnished using the softer Caran D'ache Pablos. Colours used on the background include Grass Green, Light Olive, Olive Black, Khaki Green, Light Green, Spring Green, Light Ochre, Bluish Pale and Pale Yellow. Caran D'ache colours used on the strawberry include Ruby Red, Carmine, Apricot and Salmon Pink for the pink highlights. The leaves were burnished using Light Olive, Spring Green and Pale Yellow.

Adding detail with white ink
In this final image, I used some Art Spectrum Concetrated artist's ink in white to add little hairs around the strawberry, to give definition to existing white highlights and add further tiny ones. If you enjoyed this mini tutorial, please visit http://www.miniatureartbykhull.com/tutorials_36.html to find a list of more comprehensive tutorials.

Monday, September 9, 2013

Newsletter Launch

I often get asked by artists to let them know when knew drawing tutorials are released and also for hints and tips for working with coloured pencils. Over, the weekend, whilst at our youngest son's soccer breakup, it suddenly occurred to me that a newsletter would provide the perfect way of keeping everyone up to date. I spent much of the weekend compiling an email distribution list and putting together this first, short newsletter. I am hoping to make them a little longer and more informative in the future, but just wanted to put the feelers out for this first one. If you would like to be added to the email list, you can either send me an email, or message me via Facebook with you email address. I am planning to make this a monthly issue and would love to hear if you have any ideas for tutorials or questions you think everyone might like to know about. Happy drawing. :)

Friday, September 6, 2013

Pippa - Coloured Pencils on Black Mat Board

Pippa
8x11 inches
Coloured pencil on Black Mat Board

This gorgeous little girl is called Pippa and I have drawn her a few times. She is the daughter of my artist friend Andrea Knowles, who kindly allowed me to use this reference photo again to create a drawing tutorial. I have had a bit of a passion for drawing on black surfaces and quite a few artists have asked me about skin tones when drawing on black. This 27 page tutorial is available from my website at http://www.miniatureartbykhull.com/tutorials_36.html. I have done it predominantly using Caran D'ache Pablos and Faber Castell Polychromos. The Caran D'ache are more vibrant on the black support, but do tend to sit on the surface and leave more dust, and the Polychromos are wonderful for pushing the Pablo pigment into the black surface to give a smoother, more polished look :)

Saturday, August 31, 2013

Getting your coloured pencils to pop on a black background

Full o' Beans
9x12 inches
Coloured pencil, Gouache and white ink on Black Mat Board
I have spent the last couple of weeks redoing this piece over and over. I love working on a black background, but get a bit frustrated with the way some of the coloured pencil colours, particularly the reds, lose their vibrance when working on a black background. I decided to underpaint with a white medium. Underpainting with white coloured pencil is quite ineffective and really doesn't add to the vibrancy of colours added in subsequent layers. So I experimented with white acrylic, Gouache, gesso, Colourfix primer and white watercolour. None of them gave me 100% satisfactory results. The jellybeans needed to look smooth and glossy and some of the more textured primers such as the gesso and colourfix made it hard to achieve that smoothness. The pencil didn't apply as well as I wanted over the acrylic or Gouache either. I have dabbled with the Golden Drawing ground, but find it a little too slick for coloured pencils and some of the vibrancy of colour is lost. So, I tried diluting the Gouache with the Drawing ground. The chalkiness of the Gouache was reduced with the slickness of the ground and vice versa. I still wouldn't say that this is the perfect solution, but it was the best of all the options I tried. Back to the drawing board to find that elusive magic formula!!! :)

Saturday, August 10, 2013

Colouring your Scratchboard tutorial

The Promise
8x10 inches
Scratch art, Inktense pencils, Coloured pencils and ink on Ampersand Scratchboard


When I first completed The Promise artwork, I was inundated with questions from other artists about my techniques for colouring scratchboard. In response to these questions, I have put together this 27 page step by step tutorial which shows how I went about scratching each element in the piece and then how the colour was added. The tutorial is available from my website at http://www.miniatureartbykhull.com/tutorials_36.html. For anyone new to scratch art, this piece is probably a rather ambitious one to start with, but you can still apply the principles to any piece you are working on. I have given a brief description of all the tools used and even some I didn't use, but I know other artists do use. If you are new to scratch art or scraper board, I can highly recommend Diana Lee's book Starting From Scratch. At some point, I hope to put together some more tutorials on scratchart that are much simpler. Subjects that have either fur or feathers are ideal for scratch board and so I would like to perhaps work on a cat tutorial next.

Thursday, August 8, 2013

Fun on Black

Hitching a Ride
9x12 inches
Coloured pencil on black mat board

Warts and All
8x10 inches
Coloured pencil on Black Paper
It has been a while since I have had the chance to do either art or blogging and finally I can get back into both. We had a lovely family holiday in Melbourne last month and then our eldest son and his lovely fiance had quite a large engagement party, so we have had lots of lovely things going on. I have a bit of an addiction at the moment for working on a black background - I just love the contrast that can be achieved the way the colours really stand out. 

I have been asked by several people how I get the colours to look so bright. Last year I put together a series of coloured pencil charts ( which are available from my website at http://www.miniatureartbykhull.com/tutorials_36.html) and one of the things I did when creating these charts was to do a swatch for every single colour in for four different brands of pencil on 6 different surfaces, including the black. This really helped me to work out which brands and indeed which colours stand out the most on the black surface. I have to say my all-time favourite for working on the darker surfaces are the Caran D'ache Pablo's. They give vibrant colour and layer really well. Both of these artworks were done using mostly Pablo's and then Verithins were used for the detail and the Faber Castell Polychromos were used for burnishing and polishing.

Thursday, June 6, 2013

Summer Holiday

Summer Holiday
9x12 inches
Coloured Pencil on drafting film
 
When we first start out as artists, it takes a while to work out what our own personal style is and this can be the hardest struggle of all. Over the years I have dabbled with a whole range of subject matter and materials, but quirky, colourful realism is what I always come back to and the thing that makes my heart sing. I am always grateful to have commissions and illustration work, but every now and then it is lovely to focus on creating art from the heart.

Thursday, May 9, 2013

I Love You, Mum - Kookaburras

I love You, Mum - Kookaburras
16.5 x 33 cm
Inktense pencils, coloured pencil and Pastel on Colourfix Suede
This is another illustration for the children's book entitled I Love You, Mum, due for publication by Hachette in 2014. I am using Colourfix Suede for these illustrations, which is a really versatile surface and is extremely receptive to a wide variety of media. As the Colourfix Suede is primarily heavyweight Watercolour Paper with the specially prepared primer applied, you can use water media without the fear of buckling and I find any wet media glides over the top, and because of the slight tooth, you get a very even application. The tooth on this surface is nowhere near as sandy or textured as the original Colourfix papers, so you can still get a high degree of detail, and yet also put down multiple layers. I have found most surfaces that allow for fine detail are quite limited in the number of coloured pencil layers they will accept and conversely the more textured surfaces which do allow for lots of layering are not so great for doing fine detail. 

Tuesday, May 7, 2013

Busy days

Mother Earth
8x10 inches
Coloured pencil on drafting film

I Love You, Mum - Dingos
16.5 x 33cm
Coloured pencil, Inktense pencils and Pan pastels on Colourfix Suede
 
Lot's of work lately and so not much time for posting. The Mother Earth illustration at the top of the page was a fascinating commission where the client presented me with one of Josephine Wall's beautiful paintings and asked me to recreate it in coloured pencil, but requested that I change the animals and butterflies in the wing to add a bit more detail. Josephine kindly and very generously gave permission for me to use her artwork as the reference. She truly is an inspiration and I would love to have her vision and imagination.
The illustration below is the fourth illustration for an upcoming children's book to be published by Hachette Australia in 2014.
I have also spent the last week working on another commission, which I can't reveal yet as it was commissioned as a gift.
Apart from having plenty of work to keep me busy, it has also been a very exciting time for our family, with our eldest son and his beautiful girlfriend of five years becoming engaged, so lots of lovely preparations going on. Back to the drawing board!!! :)

Monday, April 8, 2013

First demonstration for the Nepean Art Society


Just a couple of snaps from the demonstration last night, where I ran through how to do a pet portrait such as Lucy (in my previous post) using coloured pencils on drafting film. Amazingly we had 40 people turn up and what a wonderful crowd they were - attentive and interested and asking lots of questions. I couldn't have asked for a better audience. I got so much out of the night and am very hopeful that everyone who came was able to take something away as well.


Sunday, April 7, 2013

Lucy tutorial and first art demonstration


Meet Lucy - this gorgeous kitty is the subject of my latest artwork and art tutorial and a huge thank you to Viola on Flickr http://www.flickr.com/photos/aoa-/6942317269/in/set-721576230430 for allowing me to use her wonderful reference photo of Lucy. This artwork will be the subject of my first Art demonstration for the Nepean Art Society tonight, which I am extremely excited and just a teeny bit (!!!) nervous. Hopefully all who attend with get something worthwhile from the demonstration. If you would like to try your hand at drawing Lucy, you can find the 19 page step by step tutorial from my website

Sunday, March 24, 2013

The Promise

The Promise
8x10 inches
Scratch art, inktense pencils, coloured pencils and ink on Ampersand Scratchbord
 
This was one of those pieces that started out with heaps of promise. I couldn't wait to get stuck in and sink my teeth into the textures and colours and due to the complexity of the box, decided to start with that which actually ended up being the easiest part of the entire artwork. It was once the box was completed that the headaches started and this one almost ended up in the scrap heap on numerous occasions. But, I battled through each and every element and what a sense of achievement to finally finish it. It didn't end up quite as I had hoped in my mind's eye (they never do), but I was glad I didn't give in to the temptation to give up.

Thursday, March 14, 2013

Crown Prince

Crown Prince
9x5 inches
Scratch art, inktense pencil and coloured pencil on Ampersand Scratchbord
 
I have always had a bit of a love affair with peacocks and have used them several times in my art, but this time thought I would focus on the detail in their magnificent heads and crest. One of the things I love about scratchboard is that it really allows you to get a sense of the texture and 3D nature of the subject you are working on, which somehow makes the later addition of colour all the more interesting and exciting, almost like painting a sculpture. Many people have asked me to create a tutorial on colouring scratchboard pieces. At this stage, I still feel like I am refining my technique and need to create a few more before I can confidently pass on the way I scratch and colour but if you are interested in a tutorial, then watch this space - it won't be too far away :)

Tuesday, March 5, 2013

Confusion

Confusion
9x5 inches
Scratch art, inktense pencils and coloured pencil on Ampersand Scratchbord
 
With Easter rapidly approaching, I was inspired to do this little piece. Halfway through completing it, my order of tattoo needles arrived (a big thanks to all my Scratch art friends for their advice regarding these), which made my job on the Easter Eggs so much easier. It is time to buckle down now and get some illustrations done for my upcoming book, so no more scratch art for a little while, and probably a bigger gap between posts. Hope this one puts a smile on your face and gets you in the mood for Easter.
 

Tuesday, February 26, 2013

Allsorts of Temptation

Allsorts of Temptation
8x11 inches
Scratch art, inktense pencils and coloured pencils on Ampersand Scratchbord
 
Oh what fun I'm having... and this artwork was especially fun. Traditionally, scratch art is a medium most often utilised for doing fur and feathers so I am trying to push myself and the boundaries to try different subject matters and textures which is keeping me awake at night (thinking of ideas), but I do love when the creative juices are flowing. The reference photo for this artwork was my own and luckily I got a few usable ones after the first shooting as they were all quickly gobbled by the family before I had even printed off a photo!!! :)

Saturday, February 23, 2013

Dipsy

Dipsy
4x6 inches
Scratch art, inktense pencils and coloured pencil on Scratchbord
 
Dipsy is my beloved little mate and has been my constant companion over the last 14 years and hopefully fo a few more years to come. As you can see, I have become quite addicted to the scratch art lately and am hoping, when time permits, to create a whole series of artworks combining the scratch art with the coloured pencils - so much fun!!! :)

Sunday, February 17, 2013

The Light Within

The Light Within
8.5x11 inches
Scratch art, Inktense pencils and coloured pencils on Scratchbord
 
The reference photo for this artwork, was taken quite by accident when we were bush walking at Leura in the Blue Mountains and came across a beautiful little waterfall, not having a camera handy, I grabbed my iphone and snapped away. Once we got home the contrasts in the reference photo inspired me and I thought how perfect his image would be to do in scratch art. I love the way you can keep working backwards and forwards with scratch art, removing colour and adding colour, and all the time adding texture. I would have liked for the colours to be more vibrant and the sun rays were added for a bit of creative licence, but since landscapes are not something I normally attempt, this took me way out of my comfort zone and so I have to be content.
I draw strength and peace from a day in the mountains and so the Light Within is not just the sunlight you can see streaming through to the forest floor, but the strength that we draw from spending time in these serene environments and breathing in the clean air.

Saturday, February 9, 2013

Taylor

Taylor
8x10 inches
Coloured pencil on drafting film
 
Another commission of a beautiful Collie dog. With a run of commissions completed, my next job is to tackle the thumbnails for my next children's book. 2013 is shaping up to be a very busy and exciting year and it is hard to believe we are already in the middle of February!!! :)

Wednesday, February 6, 2013

Collie Commission and Tutorial


Pete
8x10 inch commission
Coloured pencil on drafting film
Meet Pete! This commission brings back memories of childhood and watching Lassie on TV. They truly are magnificent dogs and my next commission is another Collie. The lady who commissioned this portrait asked for a step by step guide as to how the portrait was created and so I thought others might be interested as well. If you would like to try your hand at drawing this Collie dog, you can find this 16 page step by step tutorial on the tutorials page of my website 

Sunday, January 20, 2013

Asking for Directions

Asking for directions
8x10 inches
Scratch art, Inktense and coloured pencils on Ampersand Scratchbord.
 
I have been flat out with commissions lately, but managed to squeeze in one little fun piece for the holidays. What fun I had with this piece and when time permits, I would love to churn out an entire series of whimsical pieces featuring scratch art and coloured pencils. I love the combination of strong contrasts and vibrant colours that can be achieved, and whilst it is slow going, I love every minute of the process. Wherever you are travelling in life, hope this puts a smile on your face :)

A couple of Cat Artworks

Roy
8x10 inches
Coloured pencil on drafting film
 
Fatso
8x10 inches
Coloured pencils on HP watercolour paper
 
Fatso was done for my Sister-in-law late last year after she lost her beloved Fatso to illness and this was one of the last images she has of him. It is always so hard saying goodbye to our precious pets, but hopefully this will help to keep his memory alive for her.
 
Roy was a post Christmas commission. I always love drawing Maine Coons - their beautiful coat and colourings are an artists delight and Roy was no exception.


Some Dog Commissions

Chompa
12x16 inches
Scratch art, Inktense and coloured pencils on Ampersand Scratchbord
Caylea
8x10 inches
Coloured pencils on drafting film
Maddie
8x10 inches
Coloured pencil on drafting film
Soxie
8x10 inches
Coloured pencil on drafting film
 
Three different blog entries today, as I have a bit of catching up to do with the latest issues Blogger are having, making it a bit more challenging to upload images. I finally worked out how to get around this issue, so please bare with me as I show some of my latest works.
 
These gorgeous dogs were all pre Christmas commissions, which I can now safely show.